Sunday, 28 February 2016

Clothes sculpt continued

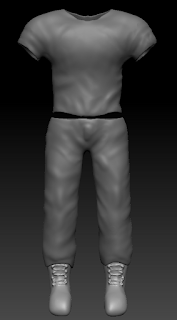
So this week I have been able to complete the clothes and accessories for my character, the clothes and accessories that the character is wearing are as follows: T-Shirt, Trousers, Boots, Belt and gun holsters.

This is what the high poly model looks like as of now:


Now that my model is complete I can move on to retopologizing the high poly model into a low poly, unwrapping the low poly's UV's and projecting normal maps from the high poly model to the low poly. 

I plan to have the retopologizing, UV's unwrapped and the normals baked and mapped by the end of next week, it is a lot to get done but I feel that I should be able to have it done. 

-J.W


Sunday, 21 February 2016

Starting to sculpt clothes

Now that I am happy with the look of my model, I have begun working on clothes for him, so far I have the T-shirt, trousers, and boots modelled, however they are still not at the level of detail I want, so over the next week I will be fine tuning the detail as well as creating any accessories I feel the character needs, such as a gun holster over his chest or a belt with holsters for water bottles, etc.

So here are a couple of renders of my models clothes currently:


As you can see in the image above, I have been adding subtle creases to add a more natural look to the T-shirt.


The same has been done with the trousers.


During my sculpt of the boots I discovered a new tool called the Curve Tube tool. 

This tool was extremely helpful in creating the laces for the boots, I plan to use this tool more during my final project to help create laces and loops with ease. 


Next week I plan to finish up the detail on the boots and start creating and finish the belt and gun holster ready to be retopologized the week after.

-J.W

Monday, 15 February 2016

Post presentation

So its been a week since my presentation, I have been using this week as a reading week, mainly to do some extra research into how a 3D character artists pipeline works and to take a look at some professional 3D character artists portfolios, this was due to my feedback from the presentation.

The feedback from the presentation mainly consisted of that I have not done enough research into how a 3D character artists pipeline flows, which I did admit to during the presentation. And that the lecturers are worried that because not enough research has been done I will not get to where I want to be at the end of the project.

After researching the 3D character artist pipeline and looking at professional character artist blogs I am confident that I can still finish what I set out to achieve.

3D Artist Pipeline

I have been looking at a number of 3D forums and professional websites that detail the ins and outs of their specific pipeline. 

Almost all of the company specific pipelines that I have looked at involve concept, modeling a high poly, retopologizing into a low poly, unwrapping and normal mapping and finally texturing. There are other steps, such rigging, skinning and animation however this does not apply to my final project so I do not need to worry about that during this time. 

During my research I found a very helpful table that outlines how the pipeline has changed through the years, this table explains very briefly how a model is made during today's standards, and luckily enough, while not actually knowing about this before hand, I have been following the third method the whole time. 


I am currently in the process of making clothes for my character which is at the very end of the first step. After that I will be retopologizing the high poly into a low poly model ready to be unwrapped and normal mapped.

My Project Timeline

Currently I do not believe I need to re iterate my timeline, as after looking at it again I am confident I can keep to what I have set each week on top of that I am up to date with the timeline already.


So after reviewing my feedback from the presentation and looking at my timeline and researching how the pipeline works in the industry I am confident that I am able to keep to my timeline and complete my final project before the submission date.

Looking at my timeline you can see that this week I will be starting to model the clothes of my model and getting them to a high quality before moving on to retopologizing.

-J.W

Bibliography

Patricia Waterman. (2014). Trends in the 3D Art Production Pipeline for Games 2014. Available: https://watermanp.wordpress.com/trends-in-the-3d-art-production-pipeline-2014/. Last accessed 15th Feb 2016.

Saturday, 6 February 2016

Model update - Something bugged me

Something was bugging me about my model, looking at it from a distance it looked extremely disproportionate, the chest was too long, and the stomach too short, he didn't have a visible neck, the shoulders were bulky, it just didn't sit right with me. I decided to re-read a couple of chapters from Zbrush Digital Sculpting, Human Anatomy by Scott Spencer, and realised something, I was not following the 8 head canon. 

The 8 head canon is a sort of guide to help make your drawings/sculpts as proportionate as possible, the idea behind it is to make your drawing/model as big as 8 of your characters heads, for example:

Taken from (Scott Spencer (2010). Zbrush Digital Sculpting, Human Anatomy. Canada: Wiley Publishing Inc. 209)


Upon discovering this information I revisited my model and made some adjustments which I feel has given my model a more natural appearance. My model is sitting in between the 7th head mark, as I felt that my model would be too tall if I were to go the full length.

Here is my model before adjusting his proportions:


And here is my model after the adjustments:


As you can see, the very tiny adjustment to his scale has made a huge improvement to how natural he looks.

Here is one last image with the 8 head canon guidelines applied:


With this information to hand, and my model looking a lot better in terms of proportion size, I will be happily creating my presentation ready for Monday.

-J.W

Bibliography - (Scott Spencer (2010). Zbrush Digital Sculpting, Human Anatomy. Canada: Wiley Publishing Inc. 209) 

Monday, 1 February 2016

General update February 1st.

Hello there, in my last blog post I stated that I would be polishing up the model and getting things ready for my seminar presentation, which is now due in a weeks time, that has not been the case however, this weekend just passed was the global games jam which I entered in with a team of friends, where we banded together to create a game based on the theme "Rituals". We did manage to create a game however unfortunately fell short of time and subsequently our game had no win or lose state.
The global games jam was an absolute blast to take part in and I thank Rob for organising the event and all my team mates that helped make our funny little game.

That being said, this is why the blog post I am currently writing is very bare, and is not posted on my regular days of Saturday/Sunday.

This week that we have now entered I will be doing what I said I would be doing last week, giving the model that little bit of fine tuning and getting relevant renders and information ready for the seminar presentation due on the 8th of February.

-J.W